Racecourse Analysis
Properly understanding and utilizing Skills is extremely important when building a competitive Uma: An A+ scoring Uma that is well-built for a specific Track will easily outperform a higher scoring Uma with generic Skills. Useful Skills, however, change on a track-by-track basis because of their specific Activation Conditions.
Therefore, analyzing the Track is of highest priority when preparing for Champions Meeting.
The Accel Zone
Outside of the basics such as high Speed and meeting Stamina requirements, the most important factor in winning Races is Acceleration. At the Final Leg, or the Accel Zone, of the Track, an Uma enters her Last Spurt and begins to accelerate to her Top Speed. Finding Acceleration Skills that consistently activate within the Accel Zone is by far the most important thing to consider when analyzing a racetrack.
Any Acceleration Skill that procs while the Uma is still accelerating is valuable!
INFO
The Uma’s Last Spurt begins at the start of the Final Leg as long as she has enough Stamina.
For more information, see Target Speed.
Every Skill has Conditions which determine where they will activate. By looking at the Track features in the Accel Zone, such as Straights, Corners, Uphills, and Downhills, we can determine which Skills will consistently help our Last Spurt.
Gambling Accels
Several Acceleration Skills, such as ![]() On Your Left!,
On Your Left!, ![]() Furious Feat, and
Furious Feat, and ![]() Head-On, activate at a random point during the Final Leg. These acceleration skills are often referred to as “gambling accels” because they have inconsistent Activation timings. These Skills perform better in shorter tracks, as the late-race is smaller relative to the Accel Zone. This means that the Skills are more likely to activate at the proper timing.
Head-On, activate at a random point during the Final Leg. These acceleration skills are often referred to as “gambling accels” because they have inconsistent Activation timings. These Skills perform better in shorter tracks, as the late-race is smaller relative to the Accel Zone. This means that the Skills are more likely to activate at the proper timing.
Random Terrain Skills
Other Acceleration Skills activate on random Track features. ![]() Corner Acceleration activates on a random Corner,
Corner Acceleration activates on a random Corner, ![]() Straightaway Acceleration on a random Straight,
Straightaway Acceleration on a random Straight, ![]() Highlander on a random Uphill, and
Highlander on a random Uphill, and ![]() Straight Descent on a random Downhill.
Straight Descent on a random Downhill.
These Skills are unreliable and not worth using unless there are very few instances of the respective feature. For example, if the only Downhill is in the Accel Zone, then Straight Descent is a viable Skill. If there are multiple Downhills, it's likely that the Skill will activate on the wrong Downhill.
WARNING
![]() Rushing Gale! activates on a random straight, which means it will almost never activate at a good time.
Rushing Gale! activates on a random straight, which means it will almost never activate at a good time.
Do not buy this skill without proper discretion.
Skill Cooldowns
Most Skills have an innate cooldown of 500 seconds and therefore do not activate more than once. There are, however, some Skills which have a base cooldown of 30 seconds, additionally scaling with the Track's length.
Skills with lower cooldowns tend to be more economic purchases because of how often they can trigger. For example, Professor of Curvature has a base cooldown of 30 seconds. On Nakayama 2500m, Professor of Curvature can activate again if there is another Corner 75 (30 * 2500/1000) seconds after the initial Activation.
30s Cooldown Skills
 Professor of Curvature /
  Corner Adept ○
- Beeline Burst / Straightaway Adept
- It’s On / Ramp Up
- See Ya Later! / Playtime’s Over!
 Corner Connoisseur /
  Corner Acceleration ○
- Rushing Gale! / Straightaway Acceleration
- No Stopping Me! / Nimble Navigator
- In the Right Place! / Slipstream
Late Race Terrain Skills
The best Acceleration Skills are ones that have Conditions which force proper Activation timing. For example, Seiun Sky's ![]() Angling and Scheming activates on the first late-race Corner while in first place. As long as the Final Leg of the Track starts on a Corner, the Skill will activate at the perfect time.
Angling and Scheming activates on the first late-race Corner while in first place. As long as the Final Leg of the Track starts on a Corner, the Skill will activate at the perfect time.
Final Corner
- Red Shift/LP1211-M
- Shooting for Victory (2nd Half)
First Corner in Late-Race
- Let's Pump Some Iron! (Late/End)
- Moving Past, and Beyond (Late/End)
- Angling and Scheming (Front)
First Straight in Late-Race
- Straightaway Spurt (End)
- Encroaching Shadow (End)
No Stopping Me!
![]() No Stopping Me! is a Skill that activates when there is another Uma close in front while Spurting. Umas will spread out on the final Corner making it difficult for
No Stopping Me! is a Skill that activates when there is another Uma close in front while Spurting. Umas will spread out on the final Corner making it difficult for ![]() No Stopping Me! to activate: On Tracks where the Uma starts her Spurt before the final Corner, she is more likely to have someone in front of her to proc the Skill. This happens more commonly on Long tracks.
No Stopping Me! to activate: On Tracks where the Uma starts her Spurt before the final Corner, she is more likely to have someone in front of her to proc the Skill. This happens more commonly on Long tracks.
Velocity Skills during the Accel Zone
Velocity Skills raise the Target Speed of an Uma. As the Uma is accelerating towards her Target Speed during the Accel Zone, Velocity Skills that activate during the Accel Zone do very little.
INFO
Fun Fact:
One of the requirements to enter Overtake Mode is for the Overtake Target to have a lower Target Speed. If another Uma has higher Target Speed but lower Current Speed, the overtaking Uma would not consider them an Overtake Target and, prior to the 11/11 Update, often get Blocked.
As Umas now spread out in the final Corner, this is very rarely relevant or applicable.
For more information, see Velocity Skills.
Analyzing Tracks for Accel Skills
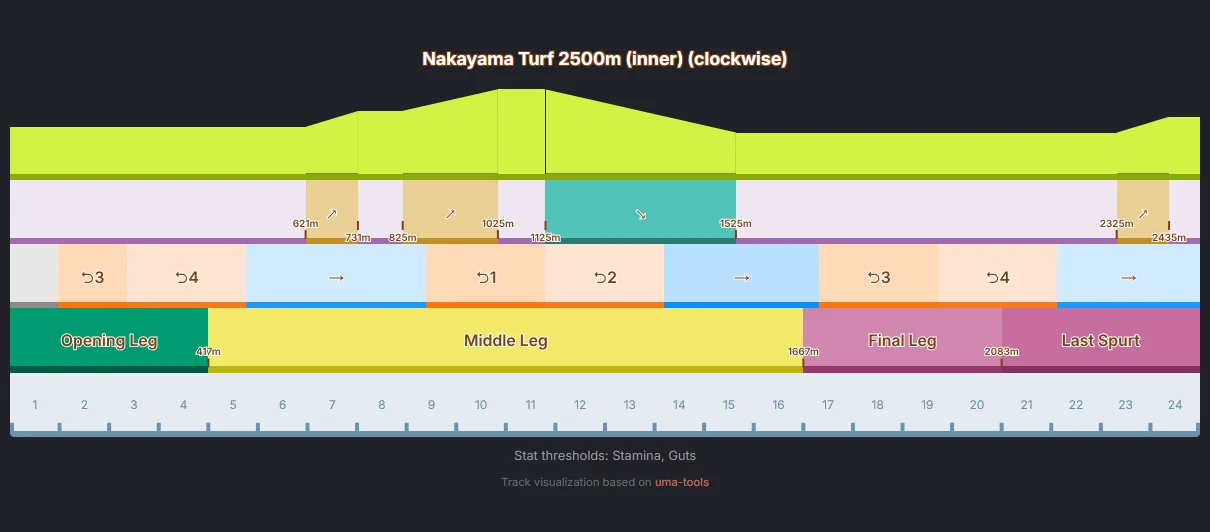
Track breakdown for Nakayama 2500m.
On the Nakayama 2500m track, the Uma will start her Spurt at the 1667m mark, which is on a Straight. We can see that Acceleration Skills that activate on the first Straight in the Accel Zone are viable here. One common example is ![]() Straightaway Spurt for End Closers. However, Corner Acceleration Skills are also viable as the first Corner is only 33 meters into the Accel Zone.
Straightaway Spurt for End Closers. However, Corner Acceleration Skills are also viable as the first Corner is only 33 meters into the Accel Zone.
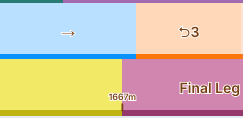
The Accel Zone of the Nakayama 2500m track, which starts on a straight and goes into a corner.
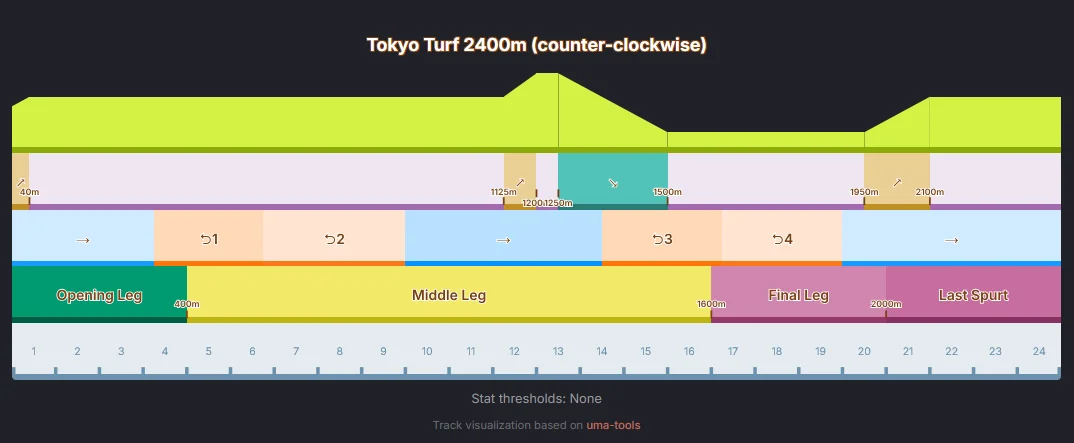
Track breakdown for Tokyo 2400m.
In contrast, on the Tokyo 2400m track, the Uma will begin her Last Spurt at the 1600m mark, which starts on a Corner and is immediately followed by the final Corner. There are no Straights within the Accel Zone, which means ![]() Straightaway Spurt cannot activate. In contrast, since the final Corner begins only 25m after the start of the Spurt, Maruzensky's
Straightaway Spurt cannot activate. In contrast, since the final Corner begins only 25m after the start of the Spurt, Maruzensky's ![]() Red Shift/LP1211-M is useful.
Red Shift/LP1211-M is useful.

The Accel Zone of the Tokyo 2400m track, which starts on a corner.
Some Racetracks will also have one or two Stats that modify Speed. There is a 5% Speed bonus for every 300 Stat threshold reached, up to 901. If there are two Stats, the average will be taken for the bonuses. We can see this in the Nakayama 2500 image above (Stamina, Guts). The full list of Champions Meeting Tracks and their bonus Stats is located here.